Hangar User Manual & Key Features
Disclosures
To avoid injury and / or damage to the bike, doorway, or stand:
- Ensure the Hangar is resting securely on the doorframe prior to suspending a bike
- Do not hang anything other than a bike from the Hangar
- Do not walk through the doorway while the Hangar is being used in the doorway
- Always remove the bike from the clamp before making any adjustments
Some bike manufacturers recommend not clamping thin-walled or carbon fiber frames. Consult manufacturer for suggested clamping locations.
Tighten the clamp lever carefully. Over-tightening may cause damage to your bike.
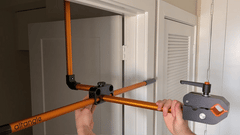
Getting Started
Step 1
Use the thumb screw located on the top of the Attachment Block (Part A) to re-position and secure the 90-Degree Offset Bar (Part B) into the rear hole of Attachment Block (Part A).

Collapsed Configuration: The 90-Degree Offset Bar (Part B) is positioned in the top right hole on the front of the Attachment Block (Part A)
Operational Configuration: The 90-Degree Offset Bar (Part B) is positioned in the hole located on the rear of the Attachment Block (Part A)
Note: The 90-Degree Offset Bar (Part B) is a two-piece part and is not meant to be separated during the set up / breakdown process.
Step 2:
Use the snap buttons to remove and insert the Upright Tube (Part C) from its collapsed position into its operational configuration.

Collapsed Configuration: The Upright Tube (Part C) is positioned in the top left hole on the front of the Attachment Block (Part A)
Operational Configuration: The Upright Tube (Part C) is positioned in the upward facing hole located on the 90-Degree Offset Bar (Part B)
Note: The Upright Tube (Part C) is a directional part. The end of the tube that is positioned in the top left of the Attachment Block (Part A) is the same end that should be inserted into the upward facing hole on the 90-degree Offset Bar (Part B). If the tube is flipped upside down the holes will not align when attempting step 3.
Step 3
Remove the Upper Support Square Tube (Part E) from its collapsed configuration and insert it onto the top of the Upright Tube (Part C) using the snap button to secure it in place.

Collapsed configuration: The Upper Support Square Tube (Part E) fits snuggly between the Attachment Block (Part A) and the Clamp (Part G) and rests on top of the Clamp Bar (Part F)
Operational Configuration: The Upper Support Square Tube (Part E) is positioned on top of the Upright Tube (Part C)
Note: To remove and insert the Upper Support Square Tube you can loosen and extend the clamp bar (Part F) or simply apply force on one of the rubber grips as shown in the motion picture above.
Step 4
Use the snap buttons to remove and insert the Cross Support Tubes (Part D) from their collapsed configuration into their operational configuration.

Collapsed Configuration: The Cross Support Tubes (Part D) are positioned on either side of the Clamp Bar (Part F) in one of the two bottom holes on the front of the Attachment Block (Part A)
Operational Configuration: The Cross Support Tubes (Part D) are positioned in one of the two holes found on either side of the Attachment Block (Part A)
Step 5

Key features
360-Degree Rotating Clamp Arm
Use the hand knob located on the rear of the Attachment Block (Part A) to enable the 360-degree rotational feature.

1. Loosen the rear hand knob referenced above by turning it approximately 3 to 4 full rotations counter-clockwise.
2. Use one hand to apply force to the middle of the Attachment Block (Part A) while using your other hand to gently pull the Clamp Bar (Part F) outward / away from the Attachment Block (Part A) to create a small gap between the internal lockout points featured on the inside of the Attachment Block (Part A) and the tail end of the Clamp Bar (Part F). This will disengage the lockout feature and allow you to freely rotate the Clamp Bar (Part F) in any direction with 360-degrees of rotation.
3. Rotate the Clamp Bar (Part F) to the desired position and apply force in the opposite direction, pushing the Clamp Bar (Part F) towards / into the Attachment Block (Part A) to close the gap and re-engage the lock out points. You should feel the lockout points re-engage. If you are unsure, simply try rotating the clamp in either direction while continuing to apply force towards the center of the Attachment Block (Part A). If the lockout points are properly engaged, the Clamp Bar (Part F) will not rotate.
4. Now that you have re-positioned your Clamp Bar (Part F), and subsequently the Clamp (Part G), you should now tighten the rear hand knob located on the back of the Attachment Block (Part A) by rotating it clockwise until tight.
Note: Do not attempt to utilize the rotational feature while a bike is suspended from the Hangar. Release the clamp, set your bike to the side, and make the appropriate adjustments prior to clamping and suspending a bike.
Dual Position Clamp
Use the thumb screw on the side of the Clamp (Part G) to adjust the clamp 90-degrees to your desired position. In the example below we are repositioning the clamp from its primary position into its secondary position.

Collapsed Configuration: The Clamp (Part G) is in its ‘primary position’ in which the Clamp Bar (Part F) is inserted in the hole located on the rear of the Clamp (Part G) and secured by a standard M6 socket head cap screw.
Operational Configuration: The Clamp (Part G) can be in its ‘primary position’ or in its ‘secondary position.’ If adjusted to its ‘secondary position’ the Clamp Bar (Part F) is inserted and secured in the hole located on the bottom of the clamp.
Note: The clamp should always be in its primary position with the handle facing upward when the Hangar is in its collapsed configuration. The ‘secondary position’ is primarily used when gripping the frame of your bike (which should always be done at users’ discretion and executed with caution). Using the secondary clamp position is also useful when clamping non-tubular seat posts while still maintaining the ability to suspend your bike in the optimal direction based on your workspace.
